Saturday, January 19, 2013

Up in the air

God did not make any boundaries or borders!

Taken by my cell phone on the way to warmer place this winter...


Saturday, January 12, 2013

Salty Snack - Jeera Khari (Day 12/ 365)

khaari

"Easy as pie" gotta change its name to easy as Khai now ;-)  Making Pie is very tricky sometimes in my humble opinion hehe.. but you can't go wrong in making Khari - just because there is nothing to do at all.

All you will need is the following -

Ingredients
Frozen Puff Pastry dough ( I used Trader Joe  brand)
A spoonful of cumin seeds, Jeera ( optional)
Butter or Ghee to grease baking tray

Process:

I bought Frozen Puff Pastry dough from Trader's Joe. Put it in regular freeze section over night to thaw.

In the morning start oven, set the temp at 375 F and get  dough ready to go in oven.
I sprinkled some Cumin (Jeera) seeds  on the dough sheet,  Keeping dough on the wax paper that it was wrapped in, roll out the dough sheet with rolling pin a little , this will set cumin in dough nice and then cut in the desired size of pieces. After cutting, I turned them in the twist to make bow like shape just for some nice change to regular shape of  khari.

Grease baking tray with light layer of clarified butter ( ghee). Khari rectangles won't need ghee or anything   on top of it but if you like it more buttery you may lightly brush on some butter on top of it before you put in oven.

For the pic you see here, I have used none on the top of it.
Put cut dough rectangles on greased baking tray in the preheat oven. Check it after approximately 15 minutes as, without touching it let it cook until it is like pink light brown in color, the timings may vary upon oven size and capacity. It would not take more than 20 mins though.  Take the kharis out and let it cool down before you dive in to taste it as it may be bit soft from inside at this point. However after cooling down it will turn into more crunchy from inside and out too. Jeera Khari is ready to to munch on with hot cup of tea :-) Good Morning !

Some call it Khaari some call it Kharee too! How do YOU call it?


Thursday, January 10, 2013

Guess who exceeded professor's expectations!

Studying was never so much rewarding and encouraging!!!


Friday, January 4, 2013

Until we get spring again....


One of my most cherished picture ever. It was taken from my patio. It reminds me of how most beautiful things come straight from nature and in its most simplistic from.

Finally back on blog  and mingling with other blog buddies via their blogs.

There will be some food , fun and other ramblings too!
So stay tuned.... 

Monday, April 23, 2012

Spring Onion Paratha- Indian flat bread with Spring Onion

Some cooking say cooking comes naturally to them. I say I never paid attention to cooking before I got married (and I still sometimes don’t ;) )
They say cooking is stress buster to them, I nod my head in agreement an realize if it is daily “job” its stress increasing for me. BUT the most fun I get is from creating my own version of dishes – new dishes. Now that is stress busters for me.
They say tradition recipes are the best and I say the best dishes are those made and served  with love.

Speaking of new dishes my mind always wanders into creating some new recipes, the only thing that complies me to do it is I easily get bored cooking same thing every day. So when I bought Spring onions this time in the back ground of my mind new ideas started growing and and the first idea that came to my mind is why not make Paratha (India style flat bread) out of it ?


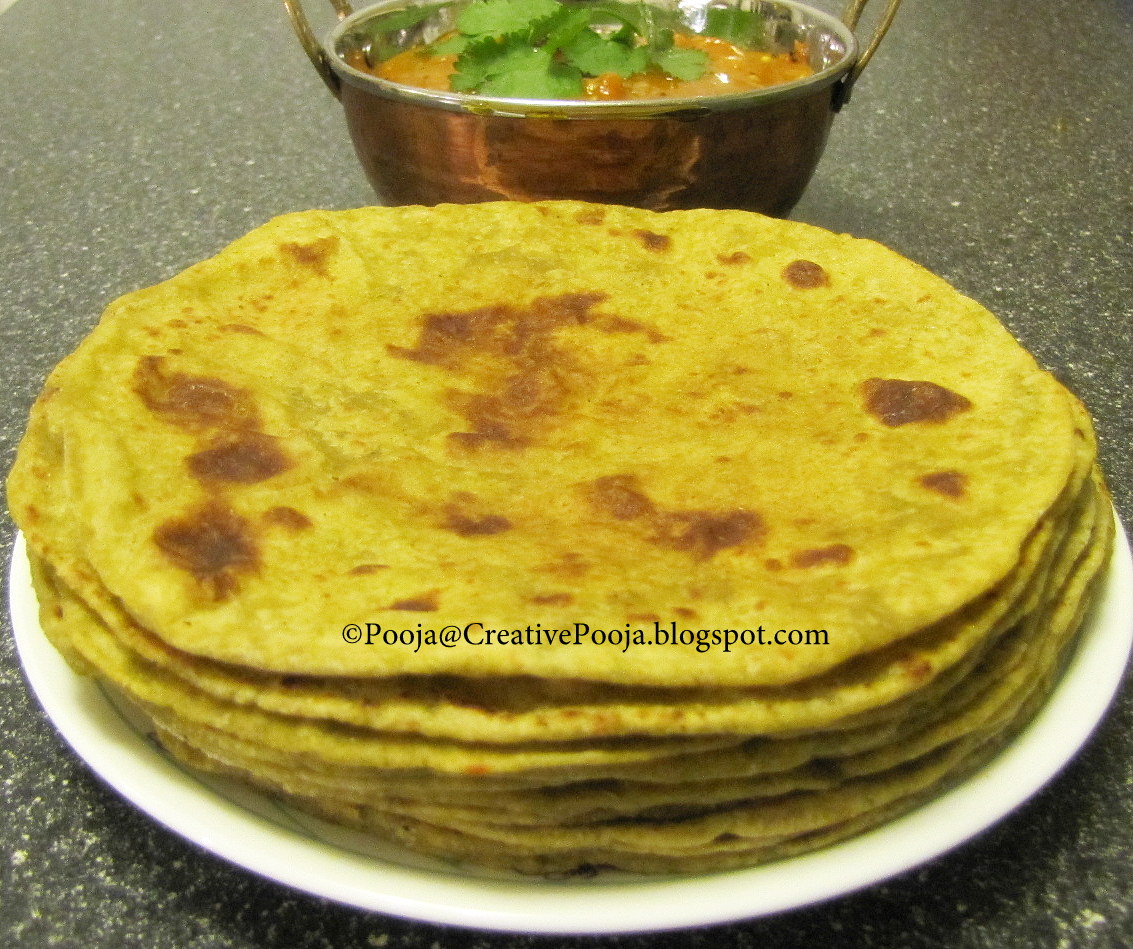
Here is how to make Spring Onion Paratha.
Cooking time approximately: 10 mins
Preparation time: 15 mins
Ingredients:
1 bunch of spring onions , washed and cut approximately  2 -3 cups
1 medium tomoto
2 green chillies ( optional)
2-3 garlic cloves
Salt to taste
For dough
2 tsp oil (any cooking oli will do)
2 cup whole wheat flour
Oil for cooking
Fine sugar 1 tsp (if you like some sweet salt in your paratha, I don’t recommend it but I know some people like it with a hint of sweet taste in their parathas)
Step by step Method:
Wash , roughly cut spring onions  and blend it to puree with chillies, tomato, garlic cloves  and salt added to it.  Do not add any water to it.

The juices of spring onion and tomato will be enough to blend it to fine puree. If you like sweet taste to it add sugar while making puree. It will reduce in volume and you will have thick puree once done. 

In a mixing bowl  or whatever you normally use for mixing dough, take 2 cups of whole wheat flour and add the spring onion puree to it, you will not need to add extra water to it.
 
First mix it will with the flour well and see if it is too firm. We need a soft dough with not too soft ,not  so firm consistency, like we usually do for chapatis or other paratha. If needed add little water to reach to desired softness of dough.
The puree to flour proportion goes 1:2. So if you  make 1 cup puree, take 2 cups of flour to start with. If by any chance if it is too soft or lumpy , add extra flour to make the perfect dough. When almost done mix  2 tablespoon oil to dough and knead well. Keep it on side for about 10 mins. 

Make round balls out of dough and roll out in round to thickness about 1/8 inches or even less.  Little thickness of rolled our paratha will give it a chance to get puffy when cooking, too thick paratha will end up being not cooked well in the middle. Keep this in mind if this is your first attempt with parathas  : )
 
On a non stick flat pan heat the pan on medium flame , let the pan get bit hot before you put on the rolled out paratha on it. 

Cook on one side until it is slightly cooked and then flip the side.

Brush oil on the half cooked side and then flip to other side 

Brush oil on other side too and then turn the side again. The first side will be almost cooked and yo u might see paratha cooking to form sme bubbles in it. 
Gently press on paratha and give it a chance to puff fully, if it will not it is fine too!
Cook on medium to low heat until you see golden brown spots on bath side. 
 
I served it with Tomato curry. I some times add sev to this curry and call it Sev Tameta nu shaak ( recipe here). It goes will without Sev too with this paratha… Spring onion/ green onion/ scallion paratha with Tangy tomato curry makes a warm wonderful evening meal…specially on the raining day it is priceless to have such comforting warm food ready to gulp on :D

Other recipes your might like:
Tomato Paratha - Tried , tested and loved by many


Wednesday, April 11, 2012

How to choose Spring Onions


 Some call it Green onion, some call it spring onion, some call it scallions and I heard a lady at super market call it long onions! Although prepared with list of groceries and veggies to buy she sounded bit confused about how to pick "long onions". That made me think it would be a good start to first post about how to pick and store Spring onions.
Here in states I don't usually see big bulbs of onions in spring onion. It is rather skinny and with less leaves than what I  used to get in India, specially in the season of winter.

Contrary to other hybrid veggies (usually bigger and fuller in volume than organic ones) I think the type of spring onions we get here is exception.


Above is what we get in India(in left)  compared to what we get in USA (on right)


Here are few pointers for picking and storing spring onion. It is easier than one would think. I was immature at picking right veggies too but slowly with some experience I started discovering what is right for my dish and for storing for long time and here it is:


To pick best of Spring onions:
  • Go for the one with green leaves and firm onion bulbs. Do not choose those with limp onion yellowish leaves. 
  • The white onion part can vary in size. I personally think the bigger it is the more tasty it will cook. However thing onions as to what we get in USA market here is also right kind to cook and make salads with. 
  • I cook it fresh and usually cut and wash it just before cooking. For busy cooks, it can be washed , dried and then cut in to small round pieces to store in a zip-lock bag until you plan to use it. 
  • As spring onions are the immature onions , they are full of moist. After cutting even when kept in refrigerator it is advisable to use it in 1-2 days. 
If you have any ideas of storing, picking this tender veggie, keep sharing.

Here is mine - Ready to store or ready to cook ? 


Thursday, October 16, 2008

I - day 2008 Roundup

I tried to make it possible to post it earlier but for one or more reason can't do it. And there was a time when I thought its too late to publish, so convincing my mind to do it at least , I recalled - Better late than never.
With my head over the heels, I was tightly busy with all possible things you can imagine. I am thankful to all of you who cared to inquired about my well being , well I was not sick except one virus attack- rather I was just busy doing other things for my professional life. A warm big hug to all of you sweet hearts there.
without much talks here is the round up of Independence day 2008.

Thursday, August 14, 2008

Happy 61st Independence day to my Indian Buddies...


Have a very Happy 61st Independence day to all my Indian buddies .

Take some time to respect the nation and culture we belongs to. From the bottom of my heart I salute those who took steps to bring freedom to India and helped it to preserve the rich culture we belongs to.


(image source- Unknown)


Here are some more entry for Theme - Independence day.

Monday, August 11, 2008

Mango pulp - Theme of the week Saffron white n Orange


Although I am not a sweet lover, I always loved sweet mangoes, specially the one which we get in season , ripe and firm , not too sweet (yeah you heard it correct- not too sweet ) and full of flesh .

Wednesday, August 6, 2008

Vegetable of the Week -Bottle Gourd Round Up

Bottle gourd round up.
55+ delicious dishes…
12 such dishes which you might have never heard of it .
Above all do u know that bottle gourd can make a wonderful one dish dinners too?
We have 8 to cherish :) .
Good chance to start eating this humble veggie and for its lovers nice recipe to enjoy your love for bottle gourd :D .


Dear friends Pratibha and Jigyasa reminded me of how much Ramdevbaba emphasis on eating bottle gourd in all possible way. Check out what I recently came through, this article, it says bottle gourd's price has shot up from Rs 4 to Rs 15 a kg.

I couldn’t control my laugh after reading it . Before its prices start rising here too get some now, keep some stored and enjoy your favorite dishes from below…. And when you are done checking round up don’t forget to vote for you favorite entries in all 3 categories.
Related Posts Plugin for WordPress, Blogger...